10 Essential Securit..> 18-Sep-2013 20:46 107k
Saturday, March 22, 2014
Computer network e-books

Wednesday, March 19, 2014
Ethical hacking and ethical hacker
Ethical hacking
Ethical hacking and a ethical hacker
are terms that describe hacking performed to help a company or
individual identify potential threats on the computer or network. An
ethical hacker attempts to hack their way past the system security,
finding any weak points in the security that could be exploited by other
hackers. The organization uses what the ethical hacker finds to improve
the system security, in an effort to minimize, if not eliminate, any
potential hacker attacks.
In order for hacking to be deemed ethical, the hacker must obey the below rules.- You have permission to probe the network and attempt to identify potential security risks. It's recommended that if you are the person performing the tests that you get written consent.
- You respect the individual's or company's privacy and only go looking for security issues.
- You report all security vulnerabilities you detect to the company, not leaving anything open for you or someone else to come in at a later time.
- You let the software developer or hardware manufacturer know of any security vulnerabilities you locate in their software or hardware if not already known by the company.
Tuesday, March 11, 2014
Hack Websites Using SQL Poizon and Havij
Hack Websites Using SQL Poizon and Havij
Requirements:
- A Brain ( Most Important )
- SQL Poizon ( Download )
- Havij 1.6 Pro ( Cracked Version Download )
- Basic Knowledge about Websites and SQL Injection
I
did not make these programs, nor did I most likely download them from
the original source. If you do not trust these, then just sandbox them.
You can download Sandboxie . Also the download to Havij is the pro/full version cracked. Want the regular one from the developers? Download Here
All Right, now that we have whatever we need, let the Tutorial BEGIN !! :)
Step 1 : Open up SQL Poizon

Step 2 : Click the "+" next to “All Dork" or just double click on “All Dorks". Next, select php. In the php section select “page.php?id="
Then, select “Engine:" then in “Engine:" select “Searchqu" you can put “max" whatever you’d like, but I put mine at 300. Note: “max" is the max amount of results your dork search will pull in. Sql poizon searches for websites with that dork that have sql vulnerabilities.
Then, select “Engine:" then in “Engine:" select “Searchqu" you can put “max" whatever you’d like, but I put mine at 300. Note: “max" is the max amount of results your dork search will pull in. Sql poizon searches for websites with that dork that have sql vulnerabilities.

Step 3 : Right
click on one of the links, then hover over “Send to Sqli Crawler".
Next, select “All". After this you will be brought to a screen that
looks like the one below. You will then want to click on crawl. Sql
poizon will crawl through the Searchqu search engine, search your dork,
and find any websites that are vulnerable or could be vulnerable to an
attack.

Step 4 : View a couple of the vulnerable websites in the “Vulnerable Links" box on the bottom half of Sql poizon.

Then, select the website you’d like to hack. Copy the url without the ’
(the apostrophe). Open up Havij and click register. For name enter:
“Cracked@By.Exidous" and for file find you folder location where havij
is and choose “HavijKey.lic". You will now have Havij Pro.
Step 5:
Find “Target:" and paste your vulnerable website in there.
Leave the rest by default and click “Analyze".
In the box at the bottom you will find information on your target such as:
- Host IP (Target website’s ip address)
- Web Server (What web server your target runs on)
- Powered-By (What your target is powered by generally php or asp)
- Keyword Found (A keyword about your target)
- Injection Type (The type of injection that Havij will use)
- DB Server (The type of database your target uses)
- Current DB (The database that havij detected)
Note: You may have more or less things displayed depending on your
target website. You can also find your target info by going to the
“Info" tab.

Step 6 : Click on the “Tables" tab, and hit “Get DBs". Once your target’s databases have loaded go ahead and find a table that looks like it could have interesting information, logins, admin info, or anything you’d like to snoop in.

I’ll be taking some customer info so I am going to my “customer" table.
Once, you select your desired table go ahead and click “Get Columns".
Havij will then proceed to get all of the columns in that table. Once
Havij loads the columns check each column you’d like to collect the data
from. Click “Get Data" and Havij will get information stored in each
column from the table you selected. Since I selected the “customer"
table from my “targets" database, Havij got data that included: ID,
parentName, street, city, state, zip, homephone, workphone, emergphone,
emergname, email, password, newsletter, savelogin, and ageNotice.
Step 7 :
Next I will be finding the admin’s data in an attempt to login in to
his cpanel or admin login. So, find a table that looks like it could
possibly admin or login. Anything of that sort will do. My table’s name
that the login is stored in is called “logins". I then checked “logins"
and pressed “Get Columns". Then, I proceeded to check each column and
hit “Get Data".

Step 8 : Once
I found the username and the password I had to decrypt the md5
encryption. To do this Havij has a built in MD5 Decrypter. Copy the
password, and click “MD5".

Step 9 : Now we need to find the admin login. To do this we need to click on the “Find Admin" tab. After that just click “start". If you need a different program you can use this one with a bigger admin text file, but I still prefer to use Havij’s built in one. But if you want, you can download Admin Finder from HERE
Step 10 : Finally, once you have found the admin login username and password, and the admin login page just go ahead and login! From there do whatever you’d like! Note: If you did not ever find the admin login information you may be able to find it by causing an error in the webpage. You might get an error like the following:
"Warning: mysql_fetch_array(): supplied argument is not a valid MySQL result resource in /home/admin/domains/yourtarget.org/public_html/page.php on line 14But if you are Lucky Enough You might HIT the Jackpot LIKE me ! :)
Monday, March 10, 2014
Quantify Your Canine: A Romp With The Whistle Tracker
Quantify Your Canine: A Romp With The Whistle Tracker


ReadWriteBody is an ongoing series where ReadWrite covers networked fitness and the quantified self.
And so I joined in. A morning run around Telegraph Hill is now part of our daily ritual. On nice days, I walk to the office rather than take the streetcar, so Ramona gets outdoor time. And on weekends, we explore more of San Francisco—destinations like Aquatic Park, Fort Mason or even Crissy Field. It's exercise for me and for her.
But how much exercise is Ramona getting? Is it enough? And is she resting enough to recuperate? A new device from a company called Whistle Labs promises to answer that.
The Quantified Woof

I also set up my brother and sister-in-law with the Whistle app, so they can monitor Ramona’s activity. Whistle even detects the proximity of designated humans, so it knows if Ramona is taking a walk with me or with my husband.

The Tracks Of A Terrier
Before the Whistle, I was already quantifying Ramona in some sense: Most of my runs are with her, and a large part of the reason for my frenetic Foursquare activity is to mark all the spots where Ramona goes.But the Whistle’s reports gave me peace of mind that I was, indeed, being a good human to my dog. A comparison to similar dogs informed me that Ramona was simultaneously getting more exercise—75 minutes a day of activity—while still managing to get more rest than the average pup. Call it the Lake Wobegon effect, but this data pleased me.

I'm keen on using the Whistle to alleviate my separation anxiety when we’re apart for the Thanksgiving holiday. The flight to the East Coast is too long for Ramona, so she stays behind in California with family. I’ll be able to keep an eye on her remotely, and reassure myself that she’s being well-cared for.

The Internet Of Dogs
Is that worth the cost? The Whistle is available for $99.95 for preorders, with shipments arriving later this year; it will go on sale at retail establishments for $129.95 next year. (A similar tracker, the FitBark, starts shipping in January.) While I dote on Ramona, I don't spend a lot on toys or treats for her; she’s pretty happy chasing a tennis ball around the house.For everyday tracking, I don’t think I need to quantify my dog: I can tell with a look that she's well-exercised. (And she lets me know if she’s bored.) But the ability to keep track of her remotely is the real selling point for these devices, I think.
But those improvements seem inevitable, given the rapid pace of innovation in hardware these days. The Internet of Things is coming to our homes; why shouldn't our pets be a part of it?
Disclosure: Canon, the official camera of Point-of-View Publishing, provided ReadWrite with an EOS Rebel SL1 digital SLR camera and paid to be mentioned in a caption and sidebar in this post.
The Quantified Fish: How My Aquarium Uses Raspberry Pi
cats get a lot of love on ReadWrite. Owen uses a fitness tracker to monitor his terrier. Adriana uses the Internet of Things to keep tabs on her cats while she’s at work.


As the owner of a betta fish, I didn’t think I’d also get a chance to join in on the fun. However, with the help of a Raspberry Pi, I found a way to make the world’s most low-maintenance pet even easier to care for than before.
The solution? A Raspberry Pi waterproof temperature
sensor. With the help of the Pi, the thermometer delivers the exact
real-time temperature to any computer on the local network that queries
for it. The hack can even be set up to deliver the temperature to any
computer on the Internet, provided you have a server configured to
receive its requests.
This project required both hardware and software
tinkering. I’ve never done any hardware hacking before, but I was able
to make it work on the first try with a tutorial from Adafruit.
Here’s how I used a Raspberry Pi to quantify my fish.
Get Ready: Assembling Hardware And Software
I’m kind of a crazy fish person. My pet, Fintan, is the
subject of much aquarium testing, a mathematically calculated diet, and
plenty of photo shoots. No price is too high for making his life better.
In this case, the price was about $50, including the Raspberry Pi. Aside from the Pi, its case, and its power source, I bought:
- A breadboard, which is a construction base for engineering prototypes. It’s great for beginning electrical engineers since there’s no soldering required.
- A pack of jumper wires. Mine came with the breadboard.
- A DS18B20 waterproof digital temperature sensor. This is the one Adafruit recommends. It looks simple, but it can transmit a lot of data.
- A Pi Cobbler, which is Adafruit’s cute name for a 26-pin header. It has abbreviations on the sides that show you where to insert wires into the breadboard.
- A 4.7k resistor. The temperature sensor requires a very low voltage, so I used this to reduce the amount of current that goes through the project.
- A wireless USB adaptor (not pictured), to operate the Pi "headlessly"—without its own monitor, mouse, or keyboard—and get it operating on my local network.
After I took a good shot of the materials for my article,
it was time to actually do some work. I put my Raspberry Pi in its case,
slid my SD card—with its initial setup software NOOBS already installed—into the slot, and connected the Pi to my TV screen and the power outlet.
In my experience, every time you do a new project with
Raspberry Pi, you need to do a fresh install of NOOBS (New Out Of the
Box Software), so in my house we keep a copy of it on an SD card. In
this case, as with every other Pi project I’ve done so far, I used it to
install Raspbian, a version of the Linux operating system Debian
customized especially for the Pi.
Tinker Like A Mad Scientist
It takes 20 minutes for Raspbian to install, so in the
meantime it was time to assemble the hardware parts—the breadboard, Pi
cobbler, wires, and temperature sensor. Fortunately, if you’re using the
Adafruit tutorial, all you have to do is match your wires to the picture.
This is where the Pi Cobbler really came in handy. I don’t
know much about circuits, and I only have a shaky high school
understanding of Ohm’s Law. But the Cobbler shows you where to put the wire for power, the wire for data, and the wire for grounding.
The hardest part, in fact, was taping the wires inside the
temperature sensor to the wires that fit inside the breadboard.
Actually, the tutorial says to just stick the temperature sensor wires
in the breadboard, but I just kept fraying and breaking the copper when I
tried to do that.
I made one attempt one at taping, which you can see in the image nearby. When it later didn’t work, my husband retaped it.
The Software: Or, Why Python Is Basically English
When Raspbian finally installed, it was time to write a
program to tell the temperature sensor how I wanted my data delivered.
Of course, this non-developer just copy-pasted the code from Adafruit.
Here’s the gist of the program: First, it sets variables
for the computer so it knows where the sensor is writing its data and
how to call it up. Next, it tells the computer to read that data into
those variables. Finally, it plugs the temperature value, which is
returned in Celsius, into a conversion formula to get Fahrenheit, and
prints out both those values.
I never learned Python and I could tell that much even
before I asked a Python programmer to spell it out for me. (He said I
already had it right.) It’s English with a funny syntax. This is why
it’s lauded as a language to teach to kids, and also why it’s been
around 23 years.
Python and Raspberry Pi also go great together. Inventor Eben Upton said it was named for Python,
but he thought spelling it like an irrational number was too good to
pass up. Since Raspberry Pi was designed to show kids how to code, it
makes sense that Upton wanted to make sure it would run one of the
easiest languages to teach to anyone.
I saved the program as Fintan.py in the Raspberry Pi’s
home folder. You can name it anything as long as you remember what you
named it.
Putting It All Together: Test, Dunk, And Go
This isn’t part of Adafruit’s tutorial, but it was
important to me to check the aquarium’s temperature remotely. Otherwise,
why set it up?
I began by putting the wireless USB adaptor in the
Raspberry Pi’s USB port in order to connect it to the Internet. The goal
is to be able to query the Raspberry Pi from any computer on the
network, but the computer won’t know where to look until you set a
static IP address for the Pi. You do this through your home router, and
it’s different depending on which brand you have. Look in your router’s
documentation to see how you set static IPs.
My Raspberry Pi’s static IP is 192.168.2.16. So in order
to make sure the Pi would transmit data headlessly, I queried it from my
Mac’s Terminal application. (If you want to do this from a PC, you’ll
need to install PuTTY before trying it out on the command line.)
In order to access the Pi remotely, I first queried it by my username and its IP address.
ssh pi@192.168.2.16
The Pi responds by asking me for user Pi’s password:
pi@192.168.2.16's password:
The password is always “raspberry” by default.
Once logged in, it’s time to access the Python program we
wrote earlier. You need to do this as a superuser, which means you type
“sudo” (short for “super user do”) to tell the computer to do something
that it would otherwise ignore from users with fewer permissions:
sudo python fintan.py
Immediately, I got a line of temperature readings that
updated once per second. I tested it by putting my finger on it to see
it warm up instantly. It was time to set up the Pi:
sudo shutdown now
I unplugged the Pi from my TV monitor and the wall outlet,
and moved it over to Fintan’s aquarium, dunking the waterproof end of
the thermometer in the tank. Now, I can check the temperature from
anywhere on my local wireless connection.
See also: 12 Cool Projects For Your Raspberry Pi
The long term goal is to configure a Web server to receive
requests from the Pi and deliver them to a website, or better yet, an
alert on my phone. I’m still researching how to best do that.
For now, I’m satisfied just having the most high-tech aquarium on the block.
Arduino lcd
LiquidCrystal - "Hello World!"
The LiquidCrystal library allows you to control LCD displays that are compatible with the Hitachi HD44780 driver. There are many of them out there, and you can usually tell them by the 16-pin interface.This example sketch prints "Hello World!" to the LCD and shows the time in seconds since the Arduino was reset.

The LCDs have a parallel interface, meaning that the microcontroller has to manipulate several interface pins at once to control the display. The interface consists of the following pins:
A register select (RS) pin that controls where in the LCD's memory you're writing data to. You can select either the data register, which holds what goes on the screen, or an instruction register, which is where the LCD's controller looks for instructions on what to do next.
A Read/Write (R/W) pin that selects reading mode or writing mode
An Enable pin that enables writing to the registers
8 data pins (D0 -D7). The states of these pins (high or low) are the bits that you're writing to a register when you write, or the values you're reading when you read.
There's also a display constrast pin (Vo), power supply pins (+5V and Gnd) and LED Backlight (Bklt+ and BKlt-) pins that you can use to power the LCD, control the display contrast, and turn on and off the LED backlight, respectively.
The process of controlling the display involves putting the data that form the image of what you want to display into the data registers, then putting instructions in the instruction register. The LiquidCrystal Library simplifies this for you so you don't need to know the low-level instructions.
The Hitachi-compatible LCDs can be controlled in two modes: 4-bit or 8-bit. The 4-bit mode requires seven I/O pins from the Arduino, while the 8-bit mode requires 11 pins. For displaying text on the screen, you can do most everything in 4-bit mode, so example shows how to control a 2x16 LCD in 4-bit mode.
Hardware Required
- Arduino Board
- LCD Screen (compatible with Hitachi HD44780 driver)
- pin headers to solder to the LCD display pins
- 10k Potentiometer
- breadboard
- hook-up wire
Circuit
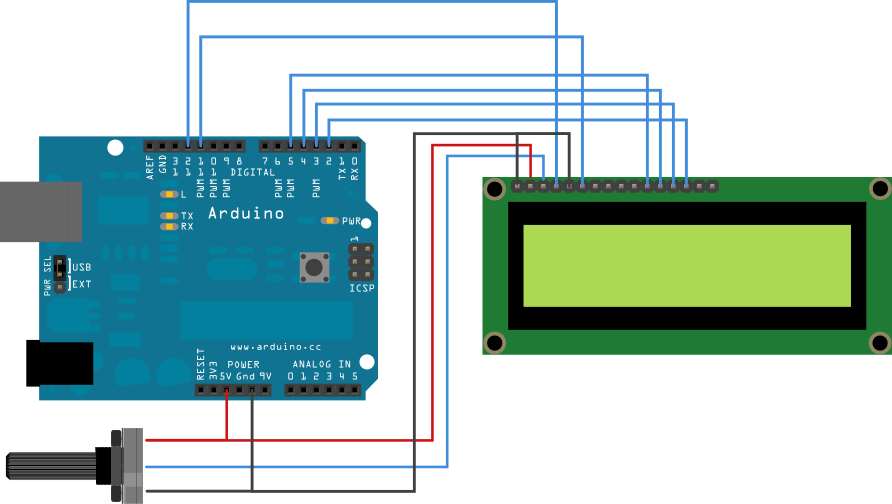
Before wiring the LCD screen to your Arduino we suggest to solder a
pin header strip to the 14 (or 16) pin count connector of the LCD
screen, as you can see in the image above.
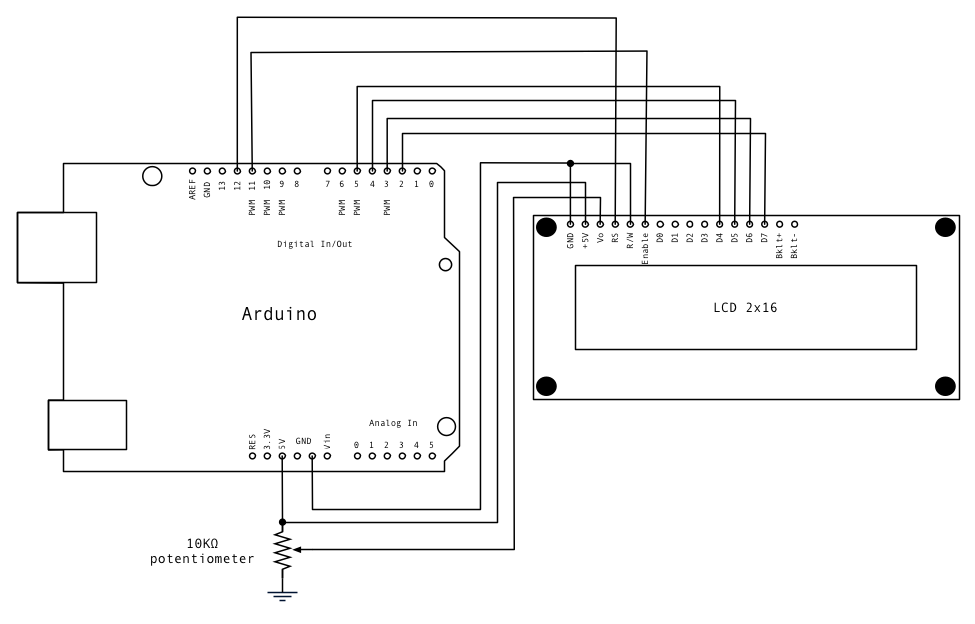
To wire your LCD screen to your Arduino, connect the following pins:
click the images to enlarge
 image developed using Fritzing. For more circuit examples, see the Fritzing project page

To wire your LCD screen to your Arduino, connect the following pins:
- LCD RS pin to digital pin 12
- LCD Enable pin to digital pin 11
- LCD D4 pin to digital pin 5
- LCD D5 pin to digital pin 4
- LCD D6 pin to digital pin 3
- LCD D7 pin to digital pin 2
click the images to enlarge
Code
/*
LiquidCrystal Library - Hello World
Demonstrates the use a 16x2 LCD display. The LiquidCrystal
library works with all LCD displays that are compatible with the
Hitachi HD44780 driver. There are many of them out there, and you
can usually tell them by the 16-pin interface.
This sketch prints "Hello World!" to the LCD
and shows the time.
The circuit:
* LCD RS pin to digital pin 12
* LCD Enable pin to digital pin 11
* LCD D4 pin to digital pin 5
* LCD D5 pin to digital pin 4
* LCD D6 pin to digital pin 3
* LCD D7 pin to digital pin 2
* LCD R/W pin to ground
* 10K resistor:
* ends to +5V and ground
* wiper to LCD VO pin (pin 3)
Library originally added 18 Apr 2008
by David A. Mellis
library modified 5 Jul 2009
by Limor Fried (http://www.ladyada.net)
example added 9 Jul 2009
by Tom Igoe
modified 22 Nov 2010
by Tom Igoe
This example code is in the public domain.
http://www.arduino.cc/en/Tutorial/LiquidCrystal
*/
// include the library code:
#include <LiquidCrystal.h>
// initialize the library with the numbers of the interface pins
LiquidCrystal lcd(12, 11, 5, 4, 3, 2);
void setup() {
// set up the LCD's number of columns and rows:
lcd.begin(16, 2);
// Print a message to the LCD.
lcd.print("hello, world!");
}
void loop() {
// set the cursor to column 0, line 1
// (note: line 1 is the second row, since counting begins with 0):
lcd.setCursor(0, 1);
// print the number of seconds since reset:
lcd.print(millis()/1000);
}
LiquidCrystal Library - Hello World
Demonstrates the use a 16x2 LCD display. The LiquidCrystal
library works with all LCD displays that are compatible with the
Hitachi HD44780 driver. There are many of them out there, and you
can usually tell them by the 16-pin interface.
This sketch prints "Hello World!" to the LCD
and shows the time.
The circuit:
* LCD RS pin to digital pin 12
* LCD Enable pin to digital pin 11
* LCD D4 pin to digital pin 5
* LCD D5 pin to digital pin 4
* LCD D6 pin to digital pin 3
* LCD D7 pin to digital pin 2
* LCD R/W pin to ground
* 10K resistor:
* ends to +5V and ground
* wiper to LCD VO pin (pin 3)
Library originally added 18 Apr 2008
by David A. Mellis
library modified 5 Jul 2009
by Limor Fried (http://www.ladyada.net)
example added 9 Jul 2009
by Tom Igoe
modified 22 Nov 2010
by Tom Igoe
This example code is in the public domain.
http://www.arduino.cc/en/Tutorial/LiquidCrystal
*/
// include the library code:
#include <LiquidCrystal.h>
// initialize the library with the numbers of the interface pins
LiquidCrystal lcd(12, 11, 5, 4, 3, 2);
void setup() {
// set up the LCD's number of columns and rows:
lcd.begin(16, 2);
// Print a message to the LCD.
lcd.print("hello, world!");
}
void loop() {
// set the cursor to column 0, line 1
// (note: line 1 is the second row, since counting begins with 0):
lcd.setCursor(0, 1);
// print the number of seconds since reset:
lcd.print(millis()/1000);
}
Subscribe to:
Posts (Atom)